zzzz~~~'s Blog
OpenStack Network - Local
OpenStack Network - Local
| Author: | Yugang LIU <liuyug@gmail.com> |
|---|---|
| Copyright: | 署名-相同方式共享 3.0 (CC BY-SA 3.0) |
Contents
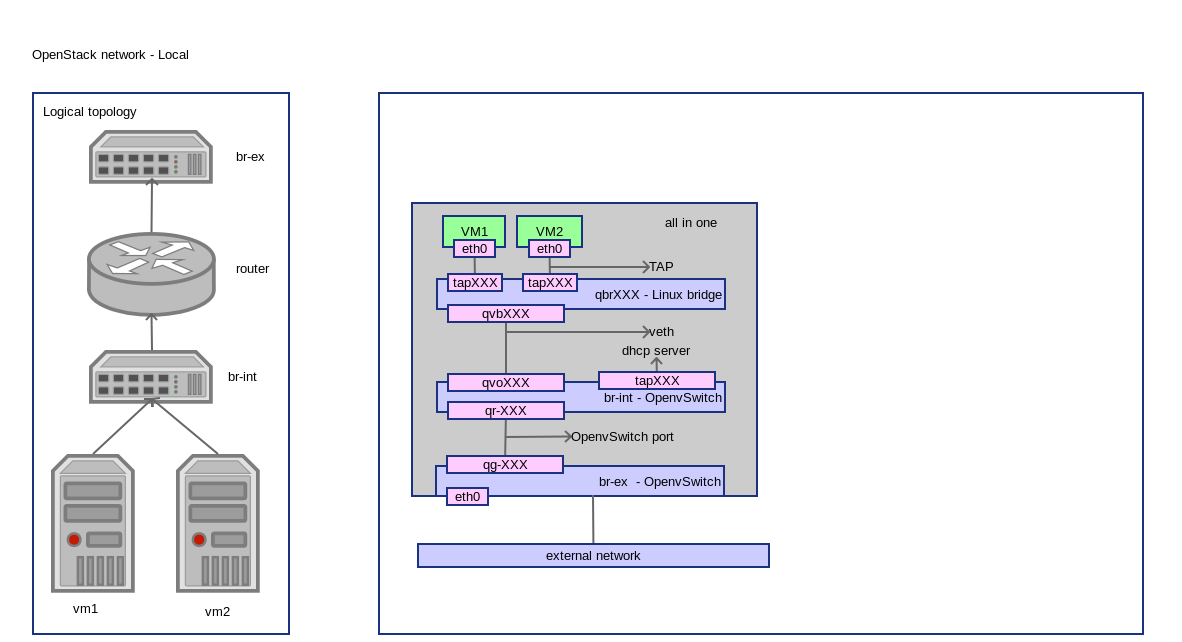
OpenStack Local 网络配置详解
其它相关文件请查阅我的 SimpleStack
1 Configure network
sh local_settings.sh
#!/bin/sh

cur_dir=`dirname  $(readlink -fn $0)`

. $cur_dir/../functions.sh
stack_conf=$cur_dir/../stack.conf

# To configure the Modular Layer 2 (ML2) plug-in
conf_file="/etc/neutron/plugins/ml2/ml2_conf.ini"
ini_set $conf_file "ml2" "type_drivers" "local"
ini_set $conf_file "ml2" "tenant_network_types" "local"
ini_set $conf_file "ml2" "mechanism_drivers" "openvswitch"
ini_set $conf_file "ovs" "integration_bridge" "br-int"

service neutron-plugin-openvswitch-agent restart
service neutron-l3-agent restart
service neutron-dhcp-agent restart
service neutron-metadata-agent restart
service neutron-server restart

# vim: ts=4 sw=4 et tw=79
2 Create external network
sh create_ext-net.sh
#!/bin/sh

cur_dir=`dirname  $(readlink -fn $0)`
. $cur_dir/../../functions.sh
stack_conf=$cur_dir/../../stack.conf

. $cur_dir/../../admin-openrc.sh

if [ "x$1" = "xclean" ]; then
    neutron router-gateway-clear demo-router
    neutron subnet-delete ext-subnet
    neutron net-delete ext-net
    exit 0
fi

FLOATING_IP_START=`ini_get $stack_conf "neutron" "floating_ip_start"`
FLOATING_IP_END=`ini_get $stack_conf "neutron" "floating_ip_end"`
EXTERNAL_NETWORK_GATEWAY=`ini_get $stack_conf "neutron" "external_network_gateway"`
EXTERNAL_NETWORK_CIDR=`ini_get $stack_conf "neutron" "external_network_cidr"`

tenant_id=`keystone tenant-list | awk '/ admin /{print $2}'`
neutron net-create ext-net \
    --shared \
    --tenant_id=$tenant_id \
    --router:external=True

neutron subnet-create ext-net --name ext-subnet \
    --tenant_id=$tenant_id \
    --disable-dhcp \
    --allocation-pool start=$FLOATING_IP_START,end=$FLOATING_IP_END \
    --gateway $EXTERNAL_NETWORK_GATEWAY \
    $EXTERNAL_NETWORK_CIDR

# vim: ts=4 sw=4 et tw=79
3 Create internal network
sh create_int-net.sh
#!/bin/sh

cur_dir=`dirname  $(readlink -fn $0)`
. $cur_dir/../../functions.sh
stack_conf=$cur_dir/../../stack.conf

. $cur_dir/../../admin-openrc.sh


if [ "x$1" = "xclean" ]; then
    neutron router-gateway-clear demo-router
    neutron router-interface-delete demo-router demo-subnet
    neutron router-delete demo-router
    neutron subnet-delete demo-subnet
    neutron net-delete demo-net
    exit 0
fi


TENANT_NETWORK_GATEWAY=`ini_get $stack_conf "neutron" "tenant_network_gateway"`
TENANT_NETWORK_CIDR=`ini_get $stack_conf "neutron" "tenant_network_cidr"`

tenant_id=`keystone tenant-list | awk '/ demo /{print $2}'`
neutron net-create demo-net \
    --tenant_id=$tenant_id

neutron subnet-create demo-net \
    --name demo-subnet \
    --tenant_id=$tenant_id \
    --dns-nameserver 8.8.8.8 \
    --gateway $TENANT_NETWORK_GATEWAY \
    $TENANT_NETWORK_CIDR

neutron router-create demo-router \
    --tenant_id=$tenant_id

neutron router-interface-add demo-router demo-subnet
neutron router-gateway-set demo-router ext-net

# vim: ts=4 sw=4 et tw=79
4 Create VM
sh tools/create_vm.sh cirros01 cirros-x86_64 demo-net
connect to VM through vnc:
nova get-vnc-console cirros01
5 Check network
5.1 compute node
ovs-vsctl show:
20add6c1-a16c-4227-982b-52dad4261a5b
    Bridge br-int
        Port "qvo7bfa2daa-66"
            tag: 2
            Interface "qvo7bfa2daa-66"
        Port "qr-cbfa75fd-e1"
            tag: 2
            Interface "qr-cbfa75fd-e1"
                type: internal
        Port "tapa042dd0d-97"
            tag: 2
            Interface "tapa042dd0d-97"
                type: internal
        Port br-int
            Interface br-int
                type: internal
    Bridge br-ex
        Port br-ex
            Interface br-ex
                type: internal
        Port "qg-c5ab6a1c-f1"
            Interface "qg-c5ab6a1c-f1"
                type: internal
        Port "eth0"
            Interface "eth0"
    ovs_version: "2.0.1"
ip link:
1: lo: <LOOPBACK,UP,LOWER_UP> mtu 65536 qdisc noqueue state UNKNOWN mode DEFAULT group default
    link/loopback 00:00:00:00:00:00 brd 00:00:00:00:00:00
2: eth0: <BROADCAST,MULTICAST,UP,LOWER_UP> mtu 1500 qdisc pfifo_fast master ovs-system state UP mode DEFAULT group default qlen 1000
    link/ether 00:26:2d:fe:da:fc brd ff:ff:ff:ff:ff:ff
3: wlan0: <BROADCAST,MULTICAST> mtu 1500 qdisc noop state DOWN mode DEFAULT group default qlen 1000
    link/ether 00:23:14:79:c7:b4 brd ff:ff:ff:ff:ff:ff
4: ovs-system: <BROADCAST,MULTICAST> mtu 1500 qdisc noop state DOWN mode DEFAULT group default
    link/ether f2:c9:24:ce:b6:13 brd ff:ff:ff:ff:ff:ff
5: br-ex: <BROADCAST,UP,LOWER_UP> mtu 1500 qdisc noqueue state UNKNOWN mode DEFAULT group default
    link/ether 00:26:2d:fe:da:fc brd ff:ff:ff:ff:ff:ff
6: br-int: <BROADCAST,UP,LOWER_UP> mtu 1500 qdisc noqueue state UNKNOWN mode DEFAULT group default
    link/ether d2:13:d2:3b:79:4a brd ff:ff:ff:ff:ff:ff
7: virbr0: <NO-CARRIER,BROADCAST,MULTICAST,UP> mtu 1500 qdisc noqueue state DOWN mode DEFAULT group default
    link/ether 92:1d:26:a8:fa:37 brd ff:ff:ff:ff:ff:ff
23: qbr7bfa2daa-66: <BROADCAST,MULTICAST,UP,LOWER_UP> mtu 1500 qdisc noqueue state UP mode DEFAULT group default
    link/ether 32:ba:59:e0:15:06 brd ff:ff:ff:ff:ff:ff
24: qvo7bfa2daa-66: <BROADCAST,MULTICAST,PROMISC,UP,LOWER_UP> mtu 1500 qdisc pfifo_fast master ovs-system state UP mode DEFAULT group default qlen 1000
    link/ether ce:6a:49:bf:59:d3 brd ff:ff:ff:ff:ff:ff
25: qvb7bfa2daa-66: <BROADCAST,MULTICAST,PROMISC,UP,LOWER_UP> mtu 1500 qdisc pfifo_fast master qbr7bfa2daa-66 state UP mode DEFAULT group default qlen 1000
    link/ether 32:ba:59:e0:15:06 brd ff:ff:ff:ff:ff:ff
26: tap7bfa2daa-66: <BROADCAST,MULTICAST,UP,LOWER_UP> mtu 1500 qdisc pfifo_fast master qbr7bfa2daa-66 state UNKNOWN mode DEFAULT group default qlen 500
    link/ether fe:16:3e:5f:1f:58 brd ff:ff:ff:ff:ff:ff
brctl show:
bridge name bridge id               STP enabled     interfaces
qbr7bfa2daa-66              8000.32ba59e01506       no              qvb7bfa2daa-66
                            tap7bfa2daa-66
virsh list:
 Id    Name                           State
----------------------------------------------------
 2     instance-00000007              running
virsh dumpxml instance-00000007 | grep tap:
<target dev='tap7bfa2daa-66'/>
- VM 使用接口 tap7bfa2daa-66
- tap7bfa2daa-66 和 qvb7bfa2daa-66 在桥 qbr7bfa2daa-66 里
ethtool -S qvb7bfa2daa-66:
NIC statistics:
     peer_ifindex: 24

# from ip link
# 24: qvo7bfa2daa-66: <BROADCAST,MULTICAST,PROMISC,UP,LOWER_UP> mtu 1500 qdisc pfifo_fast master ovs-system state UP mode DEFAULT group default qlen 1000
    link/ether ce:6a:49:bf:59:d3 brd ff:ff:ff:ff:ff:ff
ethtool -S qvo7bfa2daa-66:
NIC statistics:
     peer_ifindex: 25

# from ip link
# 25: qvb7bfa2daa-66: <BROADCAST,MULTICAST,PROMISC,UP,LOWER_UP> mtu 1500 qdisc pfifo_fast master qbr7bfa2daa-66 state UP mode DEFAULT group default qlen 1000
    link/ether 32:ba:59:e0:15:06 brd ff:ff:ff:ff:ff:ff
- qvb7bfa2daa-66 和 qvo7bfa2daa-66 是一对 veth
- qvo7bfa2daa-66 在 br-int 里
ip netns:
qdhcp-5f2ffda1-76da-427e-b3c1-4bfc088cfb75
qrouter-7052699b-ed8d-48a0-8365-50ac54017dfc
ip netns exec qdhcp-5f2ffda1-76da-427e-b3c1-4bfc088cfb75 ip link:
1: lo: <LOOPBACK,UP,LOWER_UP> mtu 65536 qdisc noqueue state UNKNOWN mode DEFAULT group default
    link/loopback 00:00:00:00:00:00 brd 00:00:00:00:00:00
22: tapa042dd0d-97: <BROADCAST,UP,LOWER_UP> mtu 1500 qdisc noqueue state UNKNOWN mode DEFAULT group default
    link/ether fa:16:3e:d3:3f:64 brd ff:ff:ff:ff:ff:ff
ps -ef | grep dns:
nobody    6390     1  0 09:11 ?        00:00:00 dnsmasq --no-hosts --no-resolv --strict-order --bind-interfaces --interface=tapa042dd0d-97 --except-interface=lo --pid-file=/var/lib/neutron/dhcp/5f2ffda1-76da-427e-b3c1-4bfc088cfb75/pid --dhcp-hostsfile=/var/lib/neutron/dhcp/5f2ffda1-76da-427e-b3c1-4bfc088cfb75/host --addn-hosts=/var/lib/neutron/dhcp/5f2ffda1-76da-427e-b3c1-4bfc088cfb75/addn_hosts --dhcp-optsfile=/var/lib/neutron/dhcp/5f2ffda1-76da-427e-b3c1-4bfc088cfb75/opts --leasefile-ro --dhcp-range=set:tag0,10.0.1.0,static,86400s --dhcp-lease-max=16 --conf-file= --domain=openstacklocal
root      7797  3390  0 10:00 pts/0    00:00:00 grep --color=auto dns
- tapa042dd0d-97 接口上是 DHCP 服务
ip netns exec qrouter-7052699b-ed8d-48a0-8365-50ac54017dfc ip link:
1: lo: <LOOPBACK,UP,LOWER_UP> mtu 65536 qdisc noqueue state UNKNOWN mode DEFAULT group default
    link/loopback 00:00:00:00:00:00 brd 00:00:00:00:00:00
20: qr-cbfa75fd-e1: <BROADCAST,UP,LOWER_UP> mtu 1500 qdisc noqueue state UNKNOWN mode DEFAULT group default
    link/ether fa:16:3e:7f:af:47 brd ff:ff:ff:ff:ff:ff
21: qg-c5ab6a1c-f1: <BROADCAST,UP,LOWER_UP> mtu 1500 qdisc noqueue state UNKNOWN mode DEFAULT group default
    link/ether fa:16:3e:61:7b:20 brd ff:ff:ff:ff:ff:ff
ip netns exec qrouter-7052699b-ed8d-48a0-8365-50ac54017dfc ip route:
default via 192.168.1.1 dev qg-c5ab6a1c-f1
192.168.1.0/24 dev qg-c5ab6a1c-f1  proto kernel  scope link  src 192.168.1.245
10.0.1.0/28 dev qr-cbfa75fd-e1  proto kernel  scope link  src 10.0.1.1
- qr-XXX 和 qg-XXX 两个接口被路由
- br-int 通过 qr-XXX, qg-XXX 路由到 br-ex
ip netns exec qrouter-7052699b-ed8d-48a0-8365-50ac54017dfc iptables -S:
-P INPUT ACCEPT
-P FORWARD ACCEPT
-P OUTPUT ACCEPT
-N neutron-filter-top
-N neutron-l3-agent-FORWARD
-N neutron-l3-agent-INPUT
-N neutron-l3-agent-OUTPUT
-N neutron-l3-agent-local
-A INPUT -j neutron-l3-agent-INPUT
-A FORWARD -j neutron-filter-top
-A FORWARD -j neutron-l3-agent-FORWARD
-A OUTPUT -j neutron-filter-top
-A OUTPUT -j neutron-l3-agent-OUTPUT
-A neutron-filter-top -j neutron-l3-agent-local
-A neutron-l3-agent-INPUT -d 127.0.0.1/32 -p tcp -m tcp --dport 9697 -j ACCEPT
ip netns exec qrouter-7052699b-ed8d-48a0-8365-50ac54017dfc iptables -t nat -S:
-P PREROUTING ACCEPT
-P INPUT ACCEPT
-P OUTPUT ACCEPT
-P POSTROUTING ACCEPT
-N neutron-l3-agent-OUTPUT
-N neutron-l3-agent-POSTROUTING
-N neutron-l3-agent-PREROUTING
-N neutron-l3-agent-float-snat
-N neutron-l3-agent-snat
-N neutron-postrouting-bottom
-A PREROUTING -j neutron-l3-agent-PREROUTING
-A OUTPUT -j neutron-l3-agent-OUTPUT
-A POSTROUTING -j neutron-l3-agent-POSTROUTING
-A POSTROUTING -j neutron-postrouting-bottom
-A neutron-l3-agent-POSTROUTING ! -i qg-c5ab6a1c-f1 ! -o qg-c5ab6a1c-f1 -m conntrack ! --ctstate DNAT -j ACCEPT
-A neutron-l3-agent-PREROUTING -d 169.254.169.254/32 -p tcp -m tcp --dport 80 -j REDIRECT --to-ports 9697
-A neutron-l3-agent-snat -j neutron-l3-agent-float-snat
-A neutron-l3-agent-snat -s 10.0.1.0/28 -j SNAT --to-source 192.168.1.245
-A neutron-postrouting-bottom -j neutron-l3-agent-snat
- 访问 169.254.169.254:80 将被转发到 169.254.169.254:9697
- 从 10.0.1.0 出发的包,源地址变成 192.168.1.245。VM 通过地址转换可以访问外网
ip netns exec qrouter-7052699b-ed8d-48a0-8365-50ac54017dfc netstat -tunlp:
Active Internet connections (only servers)
Proto Recv-Q Send-Q Local Address           Foreign Address         State       PID/Program name
tcp        0      0 0.0.0.0:9697            0.0.0.0:*               LISTEN      5957/python
ps -ef | grep 5957:
root      5957     1  0 09:10 ?        00:00:00 /usr/bin/python /usr/bin/neutron-ns-metadata-proxy --pid_file=/var/lib/neutron/external/pids/7052699b-ed8d-48a0-8365-50ac54017dfc.pid --metadata_proxy_socket=/var/lib/neutron/metadata_proxy --router_id=7052699b-ed8d-48a0-8365-50ac54017dfc --state_path=/var/lib/neutron --metadata_port=9697 --verbose --log-file=neutron-ns-metadata-proxy-7052699b-ed8d-48a0-8365-50ac54017dfc.log --log-dir=/var/log/neutron
root      7917  3390  0 10:06 pts/0    00:00:00 grep --color=auto 5957
- 9697 端口是 Neutron Metadata agent
5.2 OpenFlow
ovs-ofctl dump-flows br-int:
NXST_FLOW reply (xid=0x4):
 cookie=0x0, duration=6525.696s, table=0, n_packets=437, n_bytes=90523, idle_age=3315, priority=1 actions=NORMAL
ovs-ofctl dump-flows br-ex:
NXST_FLOW reply (xid=0x4):
 cookie=0x0, duration=6590.781s, table=0, n_packets=23602, n_bytes=3315438, idle_age=0, priority=0 actions=NORMAL
- 不做 flow 处理
Install Slackware with Virtio
Install Slackware with Virtio
| Author: | Yugang LIU <liuyug@gmail.com> |
|---|---|
| Copyright: | 署名-相同方式共享 3.0 (CC BY-SA 3.0) |
Table of Contents
1 Install Slackware with VirtIO Harddisk
在 KVM 虚拟机里安装 Slackware 不说了...直到提示重启,进入 Shell 模式:
chroot /mnt
2 制作 Slackware 引导文件
2.1 修改 lilo.conf
Slackware 用 lilo 引导,配置文件在 /etc/lilo.conf,因为要使用 VirtIO 硬盘,需要修改相关磁盘参数,从 /dev/sda 到 /dev/vda。
修改 /etc/lilo.conf 文件:
disk = /dev/vda bios=0x80 max-partitions=7
boot = /dev/vda

initrd=/boot/initrd.gz
root = /dev/vda1
2.2 建立 initrd.gz 文件
Slackware 的 VirtIO 没有编译到内核,作为模块存在,因此要加入 /boot/initrd.gz 文件来加载硬盘驱动。
建立 mkinitrd.sh,并且修改所有 /dev/sda 到 /dev/vda:
mkinitrd -c -m ext4:virtio_blk:virtio_pci -r /dev/vda2 -f ext4
3 建立 lilo 引导
lilo
4 机器重启
检验你的成果
创意无处不在
创意无处不在
怎么穿男人的衬衫

UNZIP 文件名编码
UNZIP 文件名编码
| Translate: | Yugang LIU <liuyug@gmail.com> |
|---|---|
| Original: | http://blogs.gnome.org/happyaron/2010/09/03/workaround-of-file-name-problem-while-unzip-handling-cjk-encodings/ |
Unzip 5.x 拥有 -O 选项去阐述文件名编码,但在 6.0 中默认使用 Unicode,并且这个选项被删除了,使用 UTF-8 编码的 CJK 用户需要正确解压 ZIP 文档,下面是一个解决办法。
- 安装 p7zip 和 convmv
- 执行
env LANG=C 7za x zip_file.zip
convmv -f gbk -t utf-8 --notest -r your_zip_folder
unzip 不能正确转换文件名编码,7zip 可以,然后用 convmv 转换成 UTF-8 编码。
下面是一个脚本
#! /bin/sh
LANG=C /usr/bin/7z x -y "$1" | sed -n 's/^Extracting //p' | sed '1!G;h;$!d' | xargs convmv -f gbk -t utf8 --notest >/dev/null 2>/dev/null
保存为 unzip.sh,然后运行
sh unzip.sh zip_file.zip
这个动作就像是 unzip 所做的一样,只是额外做了文件名编码转换,convmv 会自动探测文件名编码。如果文件名编码不是 GBK,请用您的编码替换它。
您应当避免的 12 个 HTML 标签错误
您应当避免的 12 个 HTML 标签错误
| Author: | Yugang LIU |
|---|---|
| Date: | 2012-10-3 |
| Category: | WEB |
| Tags: | html |
From: 12 Evil HTML Tag Mistakes You Really Should Avoid.
在 WEB 页面访问中,人们经常遇到 HTML 代码编写错误,开发者应当真正的认真考虑并小心使用 HTML 标签。下面讨论了 12 个常见的易忽略的错误,这些提示将会有助于 HTML 开发者。
1. HTML 标签嵌套错误
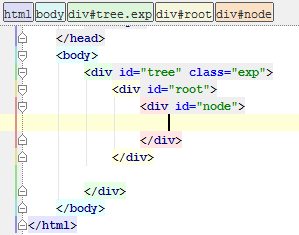
关闭 HTML 标签十分重要。标签的开启与关闭要一一对应,而且顺序相反。新手往往不在意标签的关闭。校验 HTML 代码时会发现错误,并且 Style 样式也不能正确提交。一定要小心这个错误。
错误用法:
<div><p><a>This is my Smashing text</p></div></a>
正确用法:
<div><p><a>This is my Smashing text</a></p></div>
2. 不正确的使用 List

OL 和 UL 标签总是被用于显示多个项目,并以不同的方式使用。List 标签在显示大量信息时特别有用,它能避免使用大量的换行符( <br /> ),搜索引擎也能识别 List 标签,使用标准的 HTML 标签会比 <br /> 做得更好。
3. 不正确的使用 Form 标签
form 和 table 标签常常使人迷惑。是应当先用 table,还是先用 form,请看下面:
错误用法:
<table><form><tr><td>..... </td></tr></form></table>
正确用法:
<form><table><tr>.... </tr></table></form>
4. 在 inline 元素中使用 block 元素
HTML 开发者都知道元素总是以 inline 或 block 的方式显示,每一个元素缺省被创建在 inline 或 block 元素内。在文档中,首先是 block 元素,如 <p> 和 <div> 等,inline 元素则在 block 元素内。整个文档由若干个这种结构体组成。因此,要确保 inline 元素放在 block 元素内,而不是其他地方。
block 元素:
<div>, <h1>…<h6>, <p>, <ul>, <ol>, <dl>, <table>, <blockquote>, <form>
inline 元素:
<span>, <a>, <strong>, <em>, <img />, <abbr>, <acronym>
5. 缺少 alt 属性
当使用图像并显示在主页时,一定要使用 alt 属性。这是非常必要的,用户可以决定是否显示图像,特别是在一个慢速连接或小屏幕时。这个属性能描述所显示的图像。不要使用 alt="image" 或 alt="" ,这没有任何益处。
错误用法:
<img src="smiley.gif" alt="" />
正确用法:
<img src="smiley.gif" alt="Smiley face" width="42" height="42" />
6. 粗体和斜体的使用方法错误
一般 <b> 用于粗体, <i> 用于斜体,但这两种表示方法只是计算机语法,用 CSS 样式来表达会更好一些。如果文本必须使用粗体或斜体,那么使用 <strong> 和 <em> ,他们与 <b> 和 <i> 的功能一样,但看上去更好。
7. 不必要的换行
在一段中,使用标签 <br /> 来换行。但是许多人在两个元素间加入换行,这是不对的。只有在必要时,才用 <br /> 切换到下一行。
错误用法:
This is my first paragraph
<br />
<br />
<br />

This will be my test description
正确用法:
<p>This is my first paragraph</p>
<p>This will be my test description</p>
8. 不正确的使用删除线

<strike> 和 <s> 曾用于修正 WEB 中的文本,但是现在,他们已经废除了。新的标签是 <ins> 和 <del> 。他们用于 WEB 页和文档中的插入和删除。
9. 在 HTML 代码中使用 CSS 样式
你应当听说过许多次,在 HTML 代码中使用 CSS 样式不是个好注意,你知道为什么吗?这是因为 CSS 样式和 HTML 代码是完全分离的,他们共同组成结构化文档。在 HTML 代码中直接使用样式是不正确的。这就是为什么总是建议在样式表中表达样式。
错误用法:
<p style="font-size: 14px;font-weight: bol">
10. 包含和去除边框
边框属性是一个表示效果,因此它只应当被 CSS 样式修改。不要担心默认的边框样式。
错误用法:
<img src="smiley.gif" alt="" border="0" />
11. 忽略 <h1>..<h6> 标签
<h1>..<h6> 标签用于文档识别,它创建一个区段。有时 <h> 标签会出现在文档右侧,这依靠于您的文档的组织方式。如果能按顺序使用则更好。
错误用法:
<strong>This is my Smashing Heading</strong><p>This is my xyz description.</p>
正确用法:
<h1>This is my Smashing Heading</h1><p>This is my xyz description.</p>
12. 糟糕的 <marquee> 和 <blink>

可以说, <marquee> 和 <blink> 是另外一种让 WEB 页面丑陋的方式。假如你想让一些内容引起他人的注意,您应当使用其他方式,决不要用文本闪烁和移动,这是真正让人讨厌的方式。
VIM MetaWeblog 插件
VIM MetaWeblog 插件
基本功能已经完结,以后就是加入新功能和修复 BUG 的问题了。
下载地址: https://github.com/liuyug/vim-metaweblog
安装请看 README.RST
上一篇 VIM MetaWeblog 也是同样的
VIM MetaWeblog
VIM MetaWeblog
| Author: | Yugang LIU <liuyug@gmail.com> |
|---|---|
| Github: | https://github.com/liuyug/vim-metaweblog |
| VIM: | http://www.vim.org/scripts/script.php?script_id=4411 |
Submit your RST article in VIM to Blog with metaweblog interface.
Feature:
- direct submit RST article to Blog.
- support HTML article
- automatic upload image resource and fix link for RST when new post
- browse recent blogs
- delete blog
- upload file manually
Install
- install VIM plugin
cp plugin/metaweblog.vim ~/.vim/plugin/metaweblog.vim
- Create new configuration file in ~/.vim/password.vim
1 # password.vim
2 let g:MetaWeblog_api_url='http://www.is-programmer.com/xmlrpc'
3 let g:MetaWeblog_username='username'
4 let g:MetaWeblog_password='password'
- Install CSS to support style:
1 # RST CSS style
2 cat /usr/lib/python2.6/site-packages/docutils/writers/html4css1/html4css1.css > blog.css
3 # code with scrolled bar
4 echo "pre.code { overflow: auto; }" >> bslog.css
5 # syntax highlight
6 pygmentize -S default -f html -a pre.code >> blog.css
- Upload blog.css to Blog site.
Note
Please set UTF-8 encoding in VIM
Guide
VIM shortcut keys:
<leader>bl      toggle recent blog view
<leader>bp      post article
<leader>bu      upload file under cursor in html
<leader>bb      preview for local
<leader>bs      preview for server
TODO
- How to locate original RST file by the article in Blog?
Vim Rst Post
Vim Rst Post
| Date: | 2013-01-19 |
|---|---|
| Tags: | test, vim, code |
Hello, post in vim.
中文测试!
Syntax hightlight
echo "hello"
echo "this is a test"
#include <stdio.h>
int main()
{
    printf("hello, test...\n");
}
Image

Image: same above
html modified, version 2
RST with Pygments
RST with Pygments
Pygments 为 RST 提供语法高亮度功能,但 docutils 中的 rst2html.py 不支持 Pygments 的 style 功能,下面是一种不修改程序的解决办法。
# 创建独立的 pygments css 文件
echo "pre.code { overflow: auto; }" > ~/.pygments.css
pygmentize -S monokai -f html >> ~/.pygments.css

# --syntax-highlight 使用 short 格式
# --stylesheet-path css 文件路径,多个 css 文件中间用 , 分隔
# html4css1.css docutils 默认的 css 文件
rst2html.py --syntax-highlight=short --stylesheet-path=/usr/lib/python2.6/site-packages/docutils/writers/html4css1/html4css1.css,/home/${USER}/.pygments.css input.rst
Hello World
Hello World
#!/bin/sh
echo "Hello World!"
#!/usr/bin/env python
print("Hello World!")
#include <stdio.h>
int main()
{
    printf("Hello World!\n");

}
#include <iostream>
using namespace std;
int main()

{
    cout<<"Hello World!"<<endl;
}
#if 0
gcc -o hello hello.sh
#endif
#include <stdio.h>

int main()
{
    printf("Hello World!\n");
}